Getting Started with Niantic Lightship – Full Guide to Developing Your First Lightship AR Experience
Augmented Reality is changing the way we view the world in ways we never would have imagined. Together, creators and technologists are pioneering this space by creating new immersive experiences, and bringing smiles to people all over the world. Niantic Labs captured the hearts of millions when Pokemon Go first launched in 2016, bringing players closer to their favorite Pokemon than ever possible before. Since the launch of Pokemon Go, they have continued to push the boundaries of what’s possible with augmented reality. While Pokemon Go continues to be popular, Pikmin Bloom also launched late last year, and the most exciting part for creators and developers, Niantic has also launched the Lightship Augmented Reality Development Kit, bringing the same real-time mapping technology used in Pokemon Go and Pikmin Bloom to the hands of developers to create their very own augmented reality experiences.
Cool, so what can I do with the Lightship ARDK?
Niantic’s Lightship ARDK is built around the Unity game engine platform, and provides tools for a variety of augmented reality and game development features. Leverage the semantic segmentation tools to easily differentiate the sky from the ground from the buildings, and gain an understanding of the environment around you. Use the depth and occlusion APIs to realistically show your digital character walking behind a bench at the park. Build mesh representations of the real-world, allowing the environment around you to have realistic physics in your application. Finally, share your AR experience with friends by using Lightship’s simplified networking functionality. These features are just a subset of what’s to come, and puts the power in the hands of creatives to build the augmented reality experience of their dreams.
Awesome! How can I get started with Lightship?
This guide will show you how to use the Lightship ARDK in Unity to create a simple AR experience step-by-step. Feel free to follow along in the video, or follow the text tutorial below. By the end of this guide, you’ll have a better understanding as to how to set up a project to use the Lightship ARDK, leverage a few of its key features to make a ball bounce around the space you are in, and test this functionality on your mobile device in a real-world environment. Let’s get started!
Getting Started with Niantic Lightship
Niantic Lightship is currently built on Unity, which is beneficial in many ways given how popular Unity is, and how familiar many extended reality (“XR”) creators already are with Unity. Getting up and running with Lightship will require some C# coding and Unity mobile project setup, so it’s recommended to have some programming and Unity experience before diving in. If you’re not very familiar with Unity, check out Unity’s learning area which has tutorials of varying levels and focus areas. Having a basic understanding of working in Unity will help avoid running into non-Lightship related issues. In this guide, we’ll do our best to provide detailed instructions every step of the way. If you are more experienced with Unity or XR development, some of the details in these steps may already be familiar to you.

The Project
Today we’re going to be building a little game which allows you to tap the screen on your mobile device, and sling balls around your physical space. We’ll start from the very basics by installing the tools and applications needed, set up our project in Unity, add our ball and some scripts to make our ball sling how we want it to, then we’ll focus on adding all of the Lightship pieces which will bring our project to life in an augmented reality setting.
Use this table of contents below to easily jump through different steps of our guide 👇
Project Guide
Step 00: System Requirements [00:38]
There are some requirements for your system to be able to use and run the Lightship ARDK. Please review our System Requirements documentation to ensure you’re prepared to use Lightship.
Step 0: Install Tools We’ll Need [00:48]
There are some tools we’ll need in order to create a project using Lightship, as well as to test our project on a mobile device. We won’t go into detail on these tools, but please ensure you have downloaded and installed the following:
⭐️ Unity Hub (easier to manage your Unity projects with it).
⭐️ Unity version 2020.3.2f1 (Lightship currently supports Unity version 2020.3.2f1).
⭐️ Visual Studio (if you prefer other development environments that’s fine too).
⭐️ XCode (only if you want to build to iOS, you’ll need a Mac for this).
⭐️ Lightship ARDK (put this somewhere you can find it later).
⭐️ Apple Developer Account (if you want to test your app on an iOS device).
⭐️ Android setup (some specifics are required for preparing to build to an Android device, follow this to prepare your application to run on Android).
Step 1: Create a new Unity Project [1:41]
We’re going to create a new Unity project, which we’ll integrate the Lightship ARDK with later on. To create a new Unity project:
⭐️ Open the Unity Hub application.
⭐️ Click the blue “New Project” button in the top right corner.
⭐️ Select “3D Mobile” as the platform option for the project.
⭐️ In the bottom right corner, under the “Project Name” field, give your project a name, such as “Lightship Ball Demo”.
⭐️ Click “Create Project”.
Step 2: Update Project Build Settings [2:18]
We’ll need to tell Unity what platform we’re building for, which can be configured in the project’s Build Settings.
⭐️ Navigate to “File” ➡️ “Build Settings”.
⭐️ Under “Platform”, select the platform you want to build for. I will be selecting iOS.
⭐️ Once selected, click “Switch Platform”.
⭐️ Close the “Build Settings” tab.
Step 3: Add the Lightship ARDK to the project [2:46]
Now that we’ve created a new project in Unity, we’re going to add the Lightship ARDK to the project so we can use it in our game.
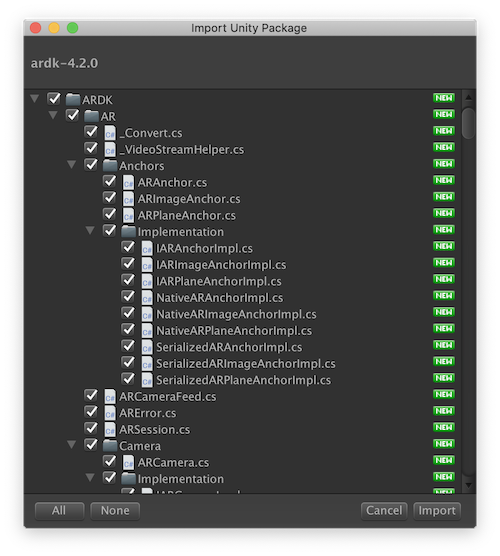
⭐️ In your Unity project, navigate to the “Assets” dropdown, then select “Import Package” ➡️ “Custom Package”.
⭐️ Navigate to wherever you downloaded the ARDK earlier, and select it.
⭐️ This will bring up the “Import Unity Package” window, with a list of items from the ARDK you can import. All items should be checked by default, go ahead and leave those checked, then click “Import”.
Step 4: Authenticate with Lightship [3:31]
To use Lightship, we need to know who you are when using it. To do this, we have you obtain an API License Key from the developer site.
⭐️ Navigate to the developer site dashboard.
⭐️ Create an account if you do not already have one.
⭐️ In the “Create a new license key” section, enter a name for your application. This can be “Lightship Ball Demo” for example.
⭐️ Click “Create”.
⭐️ Your newly created API License Key will be displayed on your dashboard. Go ahead and copy that key to your clipboard.
⭐️ Go back to your Unity project.
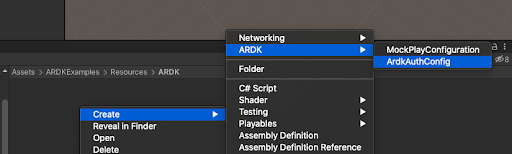
⭐️ In the “Project” tab in Unity, create a new folder called “Resources” under the “Assets” folder by clicking on the “Assets” folder, then within the “Assets” folder, right-click ➡️ “Create” ➡️ “Folder”.
⭐️ Then create a new folder called “ARDK” inside the new “Resources” directory.
⭐️ Inside your new “Assets/Resources/ARDK” folder, add a new ArdkAuthConfig asset by right-clicking ➡️ “Create” ➡️ “ARDK” ➡️ “ArdkAuthConfig”.
⭐️ Click this new asset, and fill in the API Key field in the inspector..
Step 5: Main Camera [5:16]
We’ll get to the Lightship pieces soon, but first we need to do some setting up in Unity for our game to function. We’ll start with the game’s camera:
⭐️ Click the “Main Camera” asset in the Hierarchy in Unity, this will bring up properties of the “Main Camera” in the Inspector.
⭐️ In the “Clear Flags” property, change it from “Skybox” to “Solid Color”. Since the ARDK will be leveraging the phone camera, we don’t need our camera to do anything special here.
⭐️ In the “Background” field, change the color to black. This just sets the background to a solid black color, which won’t matter once we have our phone camera involved.
Step 6: Add a Ball to our Scene [5:58]
To have a ball bounce around in real-world space, we need a ball! Let’s make one:
⭐️ In our Hierarchy, right-click ➡️ “3D Object” ➡️ “Sphere”.
⭐️ Right-click on our new “Sphere” in the Hierarchy, and rename it to “Ball”.
⭐️ With our new “Ball” selected in the Hierarchy, go to the Inspector and change our Ball’s size to 0.5 for each of the “Scale” fields to make our ball a bit smaller.
Step 7: Physics on our Ball [6:41]
This ball is nice, but it needs to have physics so it can bounce around our space. We’ll use some basic Unity components for this:
⭐️ Click on the Ball in our Hierarchy to bring it into focus in the Inspector.
⭐️ At the bottom of the Inspector, click the “Add Component” button.
⭐️ Start typing “Rigidbody”, then select “Rigidbody” when it comes up.
⭐️ Ensure your Ball also has a “Sphere Collider”. If it does not, add that component the same way you added the Rigidbody. Our Ball now has the necessary components to react to physics in our game!
Step 8: Create a Prefab of our Ball [7:27]
A Prefab in Unity is simply a reusable asset. In our game, we want to shoot as many balls as we’d like. So, let’s take our Ball object, and make it a Prefab that we can use over and over again.
⭐️ Under our “Assets” folder, create a new Folder called “Prefabs”.
⭐️ Click and drag our Ball from the Hierarchy into our new “Assets/Prefabs” folder.
⭐️ Delete our Ball from the Hierarchy (but not from our Prefabs folder). Now we have a Ball object we can use, but it won’t start in our scene.
Step 9: “SceneManager” Gameobject [8:12]
We’re almost ready for Lightship ARDK features! Just a few more steps. Next we’re going to create an empty Gameobject which will be responsible for handling our scripts and ARDK functionality:
⭐️ Right click in the Hierarchy ➡️ “Create Empty” .
⭐️ Rename our empty object to something more fitting, such as “SceneManager”.
⭐️ Select one of the Gameobjects in the Hierarchy, in the Inspector, find the “Layer” field.
✔️ Select the dropdown menu ➡️ Add Layer ➡️ in any layer that is currently empty, type in “ARDK_MockWorld”.
✔️ Adding in this layer allows us to test more functionality in the Unity editor rather than needing to have to be on a mobile device when testing an AR Session. We won’t leverage this for our project, but it does help us avoid some potential errors in the console (which are harmless, but we’ll avoid them since it’s simple). For more information on testing mock scenarios, please see our documentation on Playing in Mock Mode.
⭐️ We’ve done quite a bit of setup, don’t forget to periodically save your project.
Step 10: Ball Script [9:33]
We’ll need a small script that tells our game to shoot a ball, and to start the ARDK functionality.
⭐️ Create a new Folder under Assets called “Scripts”.
⭐️ In the new Scripts folder, create a new C# script by right clicking in the folder ➡️ Create ➡️ C# Script. We can name our script “SceneManager”, to match our gameobject.
⭐️ Double click on our new script to open it in your default development environment (probably Visual Studio).
⭐️ Copy the below code and replace the contents of the script (for details on what each piece of the script does, see the comments within the script). Once you’ve done so, save your script:
//Standard Unity/C# functionality
using UnityEngine;

//These tell our project to use pieces from the Lightship ARDK
using Niantic.ARDK.AR;
using Niantic.ARDK.AR.ARSessionEventArgs;
using Niantic.ARDK.Utilities;
using Niantic.ARDK.Utilities.Input.Legacy;

//Define our main class
public class SceneManager : MonoBehaviour
{
    //Variables we'll need to reference other objects in our game
    public GameObject _ballPrefab;  //This will store the Ball Prefab we created earlier, so we can spawn a new Ball whenever we want
    public Camera _mainCamera;  //This will reference the MainCamera in the scene, so the ARDK can leverage the device camera
    IARSession _ARsession;  //An ARDK ARSession is the main piece that manages the AR experience

    // Start is called before the first frame update
    void Start()
    {
        //ARSessionFactory helps create our AR Session. Here, we're telling our 'ARSessionFactory' to listen to when a new ARSession is created, then call an 'OnSessionInitialized' function when we get notified of one being created
        ARSessionFactory.SessionInitialized += OnSessionInitialized;
    }

    // Update is called once per frame
    void Update()
    {
        //If there is no touch, we're not going to do anything
        if(PlatformAgnosticInput.touchCount <= 0)
        {
            return;
        }

        //If we detect a new touch, call our 'TouchBegan' function
        var touch = PlatformAgnosticInput.GetTouch(0);
        if(touch.phase == TouchPhase.Began)
        {
            TouchBegan(touch);
        }
    }

    //This function will be called when a new AR Session has been created, as we instructed our 'ARSessionFactory' earlier
    private void OnSessionInitialized(AnyARSessionInitializedArgs args)
    {
        //Now that we've initiated our session, we don't need to do this again so we can remove the callback
        ARSessionFactory.SessionInitialized -= OnSessionInitialized;

        //Here we're saving our AR Session to our '_ARsession' variable, along with any arguments our session contains
        _ARsession = args.Session;
    }

    //This function will be called when the player touches the screen. For us, we'll have this trigger the shooting of our ball from where we touch.
    private void TouchBegan(Touch touch)
    {
        //Let's spawn a new ball to bounce around our space
        GameObject newBall = Instantiate(_ballPrefab);  //Spawn a new ball from our Ball Prefab
        newBall.transform.rotation = Quaternion.Euler(new Vector3(0.0f, 0.0f, 0.0f));   //Set the rotation of our new Ball
        newBall.transform.position = _mainCamera.transform.position + _mainCamera.transform.forward;    //Set the position of our new Ball to just in front of our Main Camera

        //Add velocity to our Ball, here we're telling the game to put Force behind the Ball in the direction Forward from our Camera (so, straight ahead)
        Rigidbody rigbod = newBall.GetComponent();
        rigbod.velocity = new Vector3(0f, 0f, 0f);
        float force = 300.0f;
        rigbod.AddForce(_mainCamera.transform.forward * force);
    }
}
Step 11: Attach our Script and Set up Variables [10:25]
We’ll add this script into our game and set it up so it knows what our Main Camera and our Ball are.
⭐️ In Unity, click our script asset and drag it on top of our “SceneManager” object in the Hierarchy.
⭐️ Click our “SceneManager” object in the Hierarchy to bring it up in the Inspector.
⭐️ In the “Ball Prefab” field, find your Ball Prefab we created earlier, and select it (or click and drag it).
⭐️ In the “Main Camera” field, select or click and drag our “Main Camera (Camera)” here.
Step 12: Demo Shooting the Ball [11:22]
We now should have a Ball shooting forward in our scene successfully! Let’s test it:
⭐️ Save your updated project.
⭐️ Ensure the “Game” tab is selected in the Unity editor.
⭐️ Click the Play button at the top of the editor.
⭐️ Click in the game area.
⭐️ Every time you click a Ball should now be shooting forward into the darkness!
Lightship Time! – Just a Note
Our Lenslist database includes thousands of Instagram, Snapchat and TikTok effects. Every one of them is teased by a demo video, has a direct link that opens it on mobile social apps, and is tagged depending on its style and functionalities it uses. To help you take full advantage of Lenslist, we've linked some tags related to the filters mentioned in this article. Don't hesitate to try them out!
Step 13: Adding the “AR Session Manager” Script [12:22]
As the name suggests, the “AR Session Manager” component manages an ARSessions’s lifetime. By default, this manager will run automatically, but can be controlled programmatically if needed. It seamlessly handles details such as ensuring the device supports AR, and cleaning up any outstanding AR sessions. This script is a staple when using Lightship:
⭐️ Click on the “SceneManager” object in the Hierarchy.
⭐️ In the Inspector, click “Add Component”, and start typing “AR Session Manager”.
⭐️ Select the “AR Session Manager” script when it comes up (Note: you’ll also see a “Capability Checker” script get added, this is expected).
Step 14: Adding the “AR Camera Position Helper” Script [13:13]
Again appropriately named, the “AR Camera Position Helper” component helps ensure our Unity camera is automatically placed to match your device’s position in the real world. We’ll need this in our game to help bring our AR camera to life:
⭐️ Click on the “SceneManager” object in the Hierarchy.
⭐️ In the Inspector, click “Add Component”, and start typing “AR Camera Position Helper”.
⭐️ Select the “AR Camera Position Helper” script when it comes up.
⭐️ In the “Camera” field under the “AR Camera Position Helper” component, select or click and drag our “Main Camera” to set this field.
Step 15: Adding the “AR Depth Manager” [14:00]
The “AR Depth Manager”, you guessed it, is used to assist our game with understanding the depth of real-world objects in relation to our game world. It returns a buffer of depth data for each pixel on the screen, so other systems (such as occlusion) can use it. And just like the other managers we’ve added, it’s simple to use:
⭐️ Click on the “SceneManager” object in the Hierarchy.
⭐️ In the Inspector, click “Add Component”, and start typing “AR Depth Manager”.
⭐️ Select the “AR Depth Manager” script when it comes up.
⭐️ Ensure the “Manage using Unity Lifecycle” checkbox is checked.
⭐️ In the “Camera” field, select of click and drag our “Main Camera” to this field.
Step 16: Adding the “AR Rendering Manager” [14:41]
The “AR Rendering Manager” assists with rendering our digital objects against our real-world space.
⭐️ Click on the “SceneManager” object in the Hierarchy.
⭐️ In the Inspector, click “Add Component”, and start typing “AR Rendering Manager”.
⭐️ Select the “AR Rendering Manager” script when it comes up.
⭐️ In the “Camera” field under the “AR Rendering Manager” component, select or click and drag our “Main Camera” to set this field.
Step 17: Add “ARMesh” to our Scene [15:15]
Lightship provides Mesh colliders that can easily be applied to real-world space so our real-world objects have physics to interact with our Unity objects.
⭐️ In your Assets folder, navigate to “ARDK/Extensions/Meshing/ARMesh.prefab”, and click and drag the “ARMesh.prefab” object into our scene Hierarchy.
⭐️ Click the new “ARMesh” prefab object in the Hierarchy to bring it into focus in the Inspector.
⭐️ Locate the “Mesh Prefab” field, and set this to a “MeshColliderChunk” object that is also in the “ARDK/Extensions/Meshing/” folder we navigated to previously. This already created prefab adds physics to the Mesh that Lightship will be able to detect.
⭐️ Locate the “Use invisible material” checkbox, and ensure this is checked. For debugging purposes, you could leave this unchecked to see what Lightship is detecting as “Mesh” around us, but we’ll turn it off.
Another Note
This concludes the addition of Lightship specific components in our project. While you can get very in-depth with Lightship functionality, this project demonstrates how easy it is to use some of Lightship’s most basic (but also complex beneath the surface) features.
From here, we’re going to get our project running in Unity, then test it on your mobile device in real-world space.
Step 18: Building our Project [17:08]
Now we’re going to build our project so we can test it on our mobile device:
⭐️ Select “File” ➡️ “Build Settings”.
✔️ If you are building on Android, please see around the 9m 40s mark of our Getting Started tutorial video for details on Android build settings.
⭐️ Select “Player Settings”.
✔️ Scroll down, and enter a value for “Camera Usage Description” in the “Other Settings” section.
✔️ Also locate and enter a value for “Location Usage Description”.
✔️ Lastly, fill out your details in the “Identification” section within the “Other Settings” section. Specifically, ensure there is a value for “Bundle Identifier” and “Version”.
⭐️ Close the “Player Settings” and select “Build”.
⭐️ I recommend creating a new folder to store your builds. I’ll create a folder called “Build_LightshipBallDemo”.
⭐️ Wait for Unity to finish building your project…
Step 19: Prepare to Test on our Mobile Device [18:34]
*Note: This is the step that requires an Apple Developer Account if you would like to test on an iOS device.We’re almost ready to test our game on our mobile device in real-world space! (if you are on Android, please see around the 11m mark of our Getting Started tutorial video for details for testing on Android). Once we’re setup, we’ll test on our mobile device:
⭐️ Open the XCode application on your machine.
⭐️ “Open a project or file”.
⭐️ Navigate to your “Build_LightshipBallDemo” folder.
⭐️ Find the file with the file extension “.xcodeproj”, and select it to open the project in XCode.
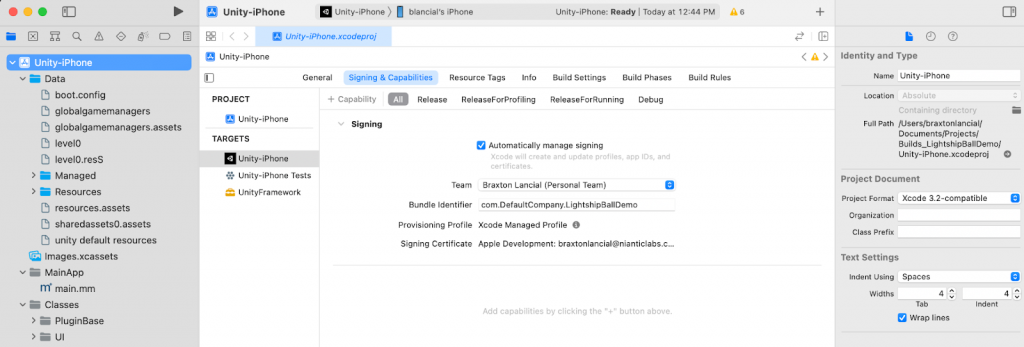
⭐️ Plug in your iPhone to your Mac.
✔️ XCode will prep your device for development, and at the top you should see your iPhone name (for example, mine says “Unity-iPhone > blancial’s iPhone”, see screenshot below).
⭐️ In the Folder layout in XCode, select the top level icon (for example, mine is “Unity-iPhone”, see screenshot below).
⭐️ Once selected, click the “Signing and Capabilities” tab.
⭐️ Check the “Automatically Manage Signing” checkbox.
⭐️ In the “Team” field, select your personal Apple team.
Step 20: Test on our Mobile Device [20:10]
Finally the time has come! Let’s play our game on our mobile device.
⭐️ Click the Play button at the top of XCode.
✔️ It will take some time to build the XCode project to your device. Ensure your iPhone is unlocked during this time.
⭐️ Once XCode has finished building your project, the application will open on your iPhone.
⭐️ Look around your area, and tap the screen to throw some balls!.
Wrap-Up
Congratulations! You have successfully built your first project using Niantic’s Lightship Augmented Reality Development Kit. We’ve only barely scratched the surface of what Lightship can do and how you can implement it in your game or application, but hopefully you’ve seen how easy it can be to add augmented reality to your project by leveraging the Lightship ARDK.
What Now?
⭐️ Check out our Tutorials page for several tutorials over specific Lightship topics.
⭐️ Join the Lightship Community Discord to discuss Lightship projects with other developers.
⭐️ Follow Lightship on Twitter and Instagram to see projects built with Lightship and stay in the know with updates to the platform.
And of course stay tuned to our updates on Lightship – something really special is coming soon, so get ready! 😎🚀 Happy Building!❤️