A closer look at Kavin Kumar SKULL ME Lens
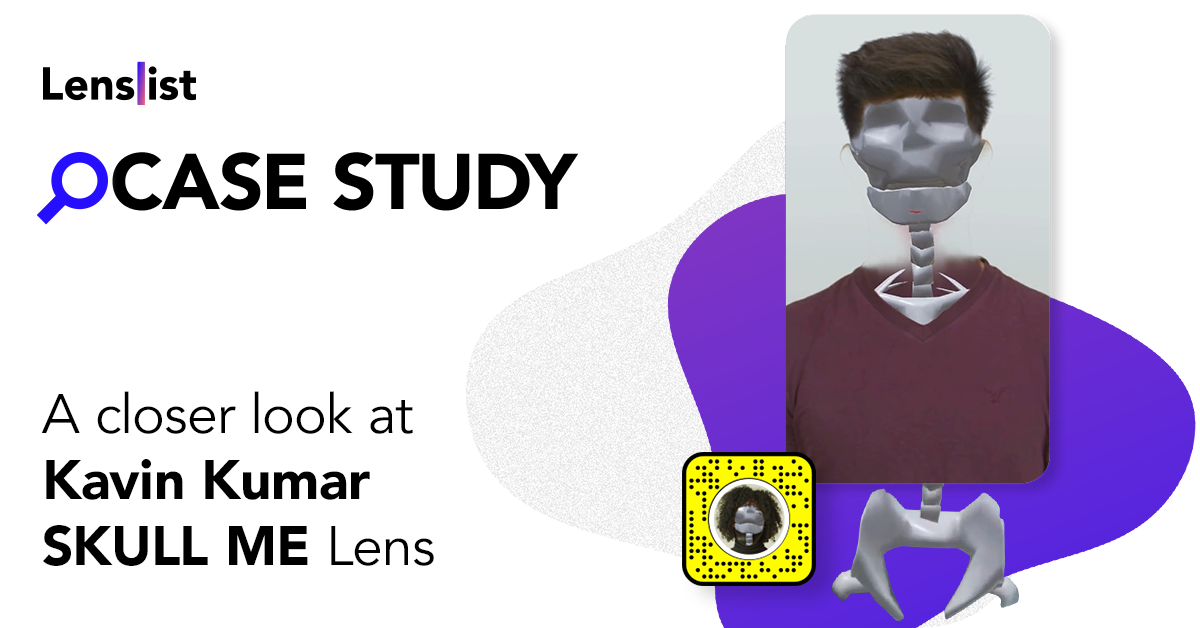
Skeletons are not fun and trendy only on Halloween – we love spooky stuff all year long! 😱☠️ That’s why today, on our ‘operating table’ we’ll be taking a closer look at the SKULL ME Lens made by the one and only – Kavin Kumar 👏🏻 He will tell you about the whole process and his inspirations, so get ready for a step-by-step walkthrough of an awesome Lens!
It’s always super exciting for us when Creators share more about their work so we can really dive into it – and who doesn’t enjoy hearing the story behind such amazing Lenses? 🚀 We feel it in our bones that you will love it 💀😉

Kavin, how did you come up with the idea of turning someone’s body into a skeleton?
 I believe AR is something that lets us change the reality to our wish. I feel it gives us the power to change reality to bend and make things that are not possible in the physical world we live in. That’s how I got the idea of converting people into living skeletons. As Halloween was nearby I wanted to do something spooky so I decided to combine the skin segmentation and the body tracking, where we show what’s underneath the skin. It was my earlier idea to show the organs but to make it spooky I stuck with the Skeletons.
What was the first step, which let the process happen?
I wanted to check if we can show a 3D model only where the skin was, so I made a simple demo showing only the part of the model where the skin segmentation happened.
Share the whole process of creation – step by step. From the beginning till the end. List your achievements as well as challenges you were facing. Did you face any problems?
One of the major problems I faced was using body tracking and skin segmentation. Skin segmentation works better when the user is close but on the other hand, body tracking works better if the full body of the user can be seen. This is how I made the lens:
- 1. I got a low poly model to achieve good and funny looks at the same time.
- 2. I rigged the model and used it on the body tracking.
- 3. I created multiple cameras to render the body tracking separately.
- 4. Using the snaps erase material I created a blank plate where the skin will be there.
- 5. By using skin segmentation I arranged them in order and only showed the part where the skin is using custom material with the help of material graph.
Was anyone else involved in the process?
So I was the only one involved in this.
Explain your attitude towards your idea as well as the process of creation.
From the beginning, I just wanted to make fun of it – a silly filter, and create something interesting as well. So I kept in mind to make this a funny filter by giving a low poly look to it.
How did you plan your work?
The whole work went very well yet there was one issue – it works best when the user is nearby to make the segmentation. As the skin segmentation is a portrait segmentation.
What methods did you use?
I used the render target and multiple cameras to render multiple things separately, so they don’t get affected by each other. And in the end, bringing them together.
Were there any ideas you finally rejected? If so, why?
I had ideas of adding organs, or other body parts but I decided not to go with that because I wanted it to be silly and funny. From the start, I wanted to see how AR can bring funny stuff to real life.
Do you have any testimonials regarding your project you could share?
As I remember I worked on this project as soon as the skin segmentation was released and learning to combine multiple skills that I learned at different stages and projects was fun.
A thing I learned during this project was to make a simple demo to check if all the features I wanted to create are feasible for that idea, rather than believing it will work for sure as some of the features like skin segmentation works the best when the user is closeby. When the user is in a distance it can’t see as it might sound doable but it might work.